Here is my latest post on the “Homeschooling with Heart” blog:
Here is my latest post on the “Homeschooling with Heart” blog:

Here is a link to my latest post on the “Homeschooling with Heart” blog:
Nature Study: Starting Sweet Potato Slips with the Dirt Method
To see my post on starting sweet potato slips with the water method, click here.
For the last two years, we’ve started sweet potato slips as a nature study project and eventually transplanted them to a container in our vegetable garden. The first year, we only ended up with some small potatoes, which I sliced up and cooked in a pot of chili. Last year, we started them earlier and supplemented with some slips that I purchased. The result was this:
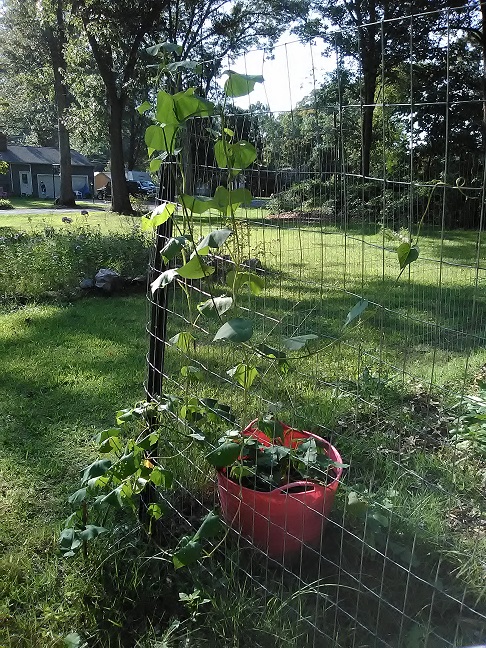
In October, frost was threatening and we dumped the bucket they were planted in. We didn’t get a huge haul, but it was an improvement over last year.

I cured them in a cardboard box with some holes poked in it that I kept in the kitchen for warmth. I finally baked the largest ones in the end of November. They were so delicious! They had a creamy texture that I’ve never experienced in a sweet potato before.

I started looking up recommendations on the best time to start my slips. I read that the fresher your sweet potatoes are, the more slips they will produce. I also came across some videos from people saying that they had better success with the dirt method than the water method, which is what I’ve used in the past. I was curious to try it, especially since some of my potatoes took so long to sprout last year that the potatoes started to get too mushy for the toothpicks to support them anymore and I ended up having to throw some of them out.
In mid-December, I followed these instructions to start slips using the dirt method:
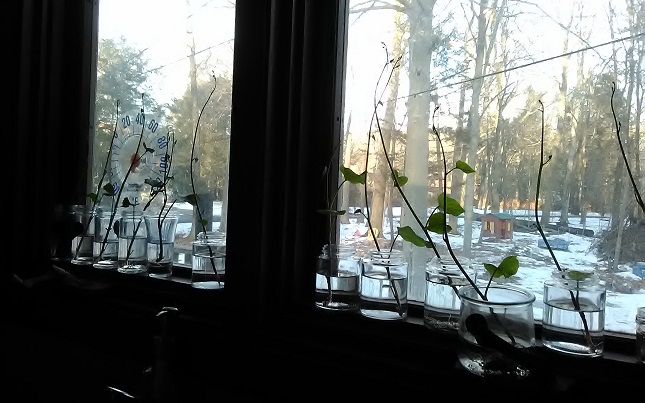
Since I had some small potatoes left from what I’d grown, I used those. I also put them in soil from the bucket I’d grown them in. I began to see slips appearing in late January. Once they began, they grew rapidly.

Once my slips reached at least six inches high, I removed them from the potatoes by grasping them as close to the base as possible and gently twisting them one way and then the other until they came loose. I placed them in a small jar of water in a sunny spot so they could grow roots. Since my window sills are small, I found that herb jars worked well. I made sure the water level was below the leaves.
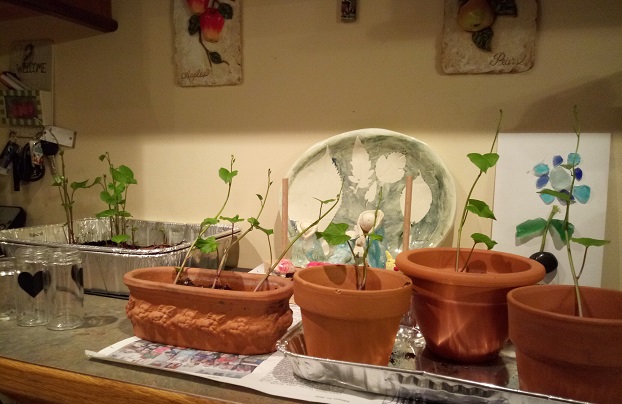
Now that some of them have nice, established roots, I planted them in pots to keep indoors until the threat of frost has passed. The sweet potatoes in the pan are continuing to produce new slips. At last count, I had about forty slips altogether, counting the ones I’ve already picked and the ones that are still in the pan. This is exponentially better than what I’ve been able to grow in the past using the water method. I believe that using potatoes from my own garden made a difference as well. They were grown organically, not treated with any chemicals, and very fresh.
Now, I just have to find room to keep all of these slips for the next two months, until I can plant them in the garden. I think I’m going to need more than one bucket this year!
Here is a post on the water method and the nature study pages that we utilized last year.

I previously shared with you some of the lessons I have been learning about how setting boundaries with our children and with others can help us homeschool more effectively. However, sometimes the biggest boundary conflict does not come from without; it comes from within.
Have you ever felt like your homeschool day just “gets away from you”? You have a plan of everything you were going to accomplish, but at the end of the day, you have only been able to do a fraction of it. How do other moms manage to get it all done?
Are you a good starter but not a good finisher? You love coming up with cool homeschool ideas but have trouble following them through to completion. Are you easily distracted by new, exciting curriculum instead of finishing up with what you already began? Are you unable to say “no” to other pressures that take time away from school?
Do you lose your temper and say things that are discouraging instead of encouraging? Are you financially strapped because you can’t seem to live within your means? You keep trying to get your act together, but nothing seems to work.
If you said “yes” to any of these questions, you might have a problem with internal boundaries.
We are often our own worst enemy. Although setting boundaries with others can be challenging, in the end, we are only responsible to others, but not for them. We are responsible for ourselves, though, making internal problems harder to deal with than external ones. In addition, the strategies we gravitate toward to solve these conflicts may be ineffective. In the book, “Boundaries: When to Say Yes, When to Say No to Take Control of Your Life,” authors Drs. Henry Cloud and John Townsend point out that those with poor internal boundaries may withdraw from relationships when they most need the support of others because of the shame they feel about their personal failures. Instead, they try to use their willpower to solve their boundary problems, thinking that they can just muscle through them.
As I re-read this chapter in preparation for writing this article, I felt convicted. I absolutely do this. Of course, the difficulty of reaching out is that it has to be to someone who will have empathy and respond with love and support. If one already has weak boundaries that developed as a result of a dysfunctional or abusive childhood, it can be hard to know who to trust.
However, making an idol of our own will is not the solution. Be honest with yourself about where you are struggling. Take time to examine what the root causes of those struggles are. Identify the specific boundary conflict and pray for insight into the underlying need that it is masking. Then, admit that you cannot heal yourself, and lay it at the feet of Jesus instead.
“Therefore confess your sins to each other and pray for each other so that you may be healed. The prayer of a righteous person is powerful and effective.” – James 5:16
If you are interested in reading more about boundaries, you can find part one here and part two here. As an Amazon associate, I earn from qualifying purchases.
Last month, I wrote about the challenge of setting boundaries with my children and how important that is to homeschooling effectively. Another area where it is helpful to learn and apply appropriate boundaries is with other adults in your life.
One of the ways that many homeschoolers face an invasion of boundaries is unsolicited opinions. It can be frustrating dealing with people who criticize your choice to homeschool, ask leading questions like “Don’t you need to be certified to homeschool?” or give your child pop quizzes to test how much they’ve learned. This can be particularly difficult if it comes from close family or friends.
Initially, I did not know how to handle these intrusions. Over time, I’ve discovered that the motivation can range from simple curiosity, to ignorance of something out of the norm that they have no experience with, to jealousy, and sometimes, the assumption that you must be judging them if you made a different educational choice for your children than they did. I’ve found that these conversations seem to go better if:
Another boundary that I’ve learned to set is with people who try to interrupt the flow of our school day. It could be a friend who wants to schedule a play date, someone who calls during the day expecting that you are able to chat, or the friend who always expects you to babysit her child when they have off from school because you are home during the day. Before you let others interfere with your schedule, consider:
Keep in mind as you navigate these situations that, ultimately, your responsibility to your children is greater than your responsibility to your friends or extended family. God will lead you in handling these moments as you focus on that truth instead of allowing emotions to dominate your decisions.

When I was preparing to begin homeschooling, I knew that I would need some kind of curriculum, school supplies, a plan and a method. However, once I was in the thick of it, I realized there was one area where I was desperately unprepared: setting boundaries.
Years ago, a Christian counselor recommended a book to me, “Boundaries: When to Say Yes, How to Say No, To Take Control of Your Life.” I purchased it, but shortly after, began dating my husband and got distracted. It sat on my bookshelf for a decade before God confronted me with the fact that I still had issues in this area that needed to be addressed. Once I began reading it, I was surprised to realize how much of my life was being affected by my lack of boundaries. Having grown up with a mother who struggled with addiction, I was often placed in the position of being the mother instead of the child. I never learned to say “no” to responsibilities that were not my own or to set limits with others.
This caused me to grow into a parent who did not know how to set the appropriate limits with my children, either. As a result, the biggest struggle that I have faced while trying to teach my children is simply having them cooperate and obey. In the summer edition of The Old Schoolhouse Magazine®, there was an article by Deborah Wuehler, entitled “The Importance of Obedience and How to Get Your Kids on Board” that outlined some of the steps that she uses to teach her children obedience. She instills in them as toddlers that she expects them to obey immediately, completely and cheerfully. That was mind-blowing to me, as my children never respond to any request that I make the first time, which is my biggest pet peeve.
If I would have realized my own weakness in this area sooner, I would have addressed it in counseling long ago and been prepared to lay the groundwork of teaching obedience to my children when they were very young. Of course, later is better than never. The challenge of doing it when my children are several years into homeschooling is that habits have been formed that need to be corrected.
If you are having trouble setting limits with your children and find yourself repeating requests ad nauseam before they obey you, I highly recommend reading Deborah’s article and the book, “Boundaries” or “Boundaries with Kids” by Drs. Henry Cloud and John Townsend. Cooperative children are so much easier to teach! Most importantly, we are not only teaching them reading and writing, but responsibility – understanding what they are responsible for and what they aren’t responsible for, knowing how to say “no” and how to accept a “no.” By setting external boundaries for them now, our children will eventually develop internal boundaries, which will be invaluable to them in adulthood and ultimately, in parenting their own children one day.
As an Amazon associate, I earn from qualifying purchases.

Each spring, my children and I start seeds for nature study. Eventually, we transplant them to the garden, care for the plants and harvest the fruit. A few years ago, we decided to allow the process to come full circle by learning how to save the seeds as well. There are a few different ways to save seeds for your plants and it depends on the type of seed.
Bean plants are easy to save seed from. You simply leave some of the pods on the plant until the fall, when the skin of the bean in completely dry and papery. Then, you pick them, remove the beans from the skin and label an envelope to save them in for planting in the spring.
Many other seeds can be saved by fermenting. The fermentation process can help control seed-borne diseases from affecting your future plants. We have saved tomatoes, peppers, eggplant, and pumpkins/squash this way. Make sure the fruit is completely ripe first. Remove some seeds, rinse any pulp off of them, and place them in a jar of water. Stir the seeds carefully with a spoon once a day for about three days. You will notice that some of the seeds float to the top and some sink to the bottom of the jar. The floaters are not viable and can be discarded at the end of the third day. Next, strain the contents of the jar, saving the seeds that sunk to the bottom. I pour mine into a tea sock. Then, I spread them on a plate until they are completely dry, at which point I seal them in a labeled envelope.
You may want to write the year that you saved the seeds along with the name of the plant, in case you do not plant all of them and have some leftover the next year. I have successfully used seeds a couple of years after saving them, but they do decrease in viability with age. Another trick for keeping them is to place the envelopes of saved seeds in a container in the back of the refrigerator. The cold temperature keeps them fresh longer.
Interestingly, I found that the seeds that we planted this year that had been saved from our own garden actually grew much more robust plants than our store-bought seeds. I am not sure if they were more acclimated to our particular soil, but I think it will make an interesting nature study experiment next spring, to compare our own seeds to the purchased ones and chart their progress.
Another fun activity that my children did was to set up a stand in our front yard and sell packets of saved seeds, sort of like a lemonade stand.
There’s something really special about planting seeds that you’ve saved from your own plants. It gives children a visual of the way God provides for us and helps them to see the whole circle happening first-hand.
“Very truly I tell you, unless a kernel of wheat falls to the ground and dies, it remains only a single seed. But if it dies, it produces many seeds.” – John 12:24
As an Amazon associate, I earn from qualifying purchases.
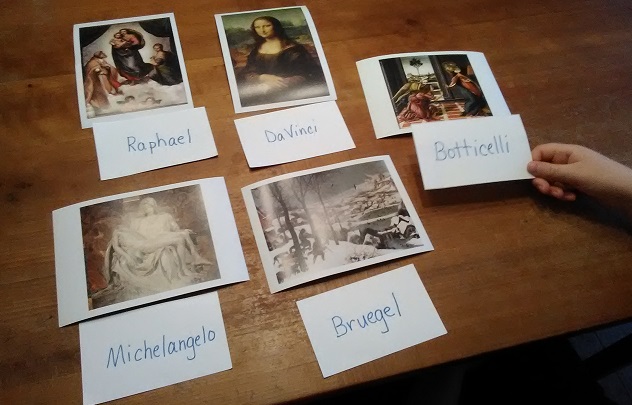
In this post, I explained how we did our Renaissance artist study last spring. It turns out that one of the resources that we used to study the life of Michelangelo is currently available as a free download here. There is also a free supplement available about two of his masterpieces – The Pieta and The Ceiling of the Sistine Chapel. You will see the price reduce to $0.00 after you add them to your cart.
If you are planning to do more art history study in the future, you may also be interested in a bundle by the same publisher that is on sale right now, called The Masters and Their Masterpieces. Do yourself a favor and download the two free items first. It will give you credit towards your purchase, bringing your total purchase price down to $8.58 for 24 separate lessons, including Da Vinci, Cassatt, Renoir, Degas, Van Gogh, Rembrandt, Monet and more! Since I already own several of the titles that are included, I ended up only paying $4.
Back-to-school sales are awesome, aren’t they?


Recently, as we were en route to a camping trip, my six-year-old wondered how much longer the ride would take. Instead of asking, “Are we there yet?” she said, “How much more time until we reach our destination?”
My husband and I chuckled at her choice of words but we weren’t surprised. My eight-year-old son was recently evaluated by a speech language pathologist. We discovered that the stroke that he suffered at birth has impacted how his mind processes the written word. However, she was surprised to find that his vocabulary and grammar skills, and his ability to understand language and express it verbally, was very advanced for his age.
I have no question how this came about. My husband and I followed two steps, which set the stage so this process could happen organically – no vocab tests or drills needed.
There is no need to be legalistic about this approach. When we go to the library, my daughter often picks picture books that are aesthetically appealing to her but are not very challenging. That’s fine; I simply add some classic books that I know she’ll like as well. In the end, she usually prefers what I picked for her.
Although we began this process with our children when they were very young, I think it would be beneficial to begin family read-aloud time with good books at any age. I believe that the learning challenges that my son may face will be offset by the advantages that his exposure to quality literature has given him. Most importantly, my children have learned that reading is a pleasurable experience, one that you never outgrow.
As an Amazon Associate, I earn from qualifying purchases.
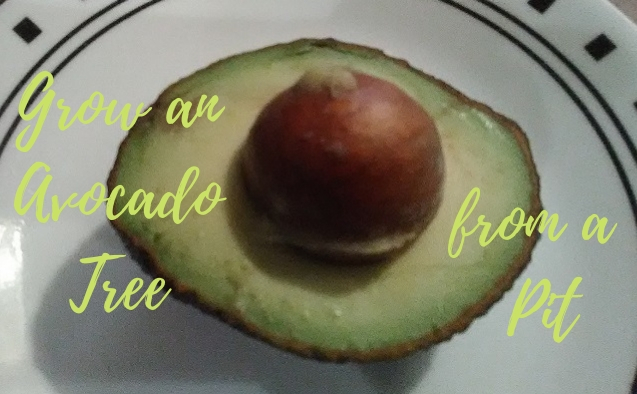
Last fall, after making some guacamole, I decided to grow an avocado tree from the pit that I’d removed from the avocado. I mentioned in this post that it took until March to get a root. I also mistakenly told you that the pointy end of the pit gets submerged in water. Maybe that’s why it took so long to root!
There are a couple of ways to grow a tree from an avocado pit, but the one I’ve used is the toothpick method. The steps are:

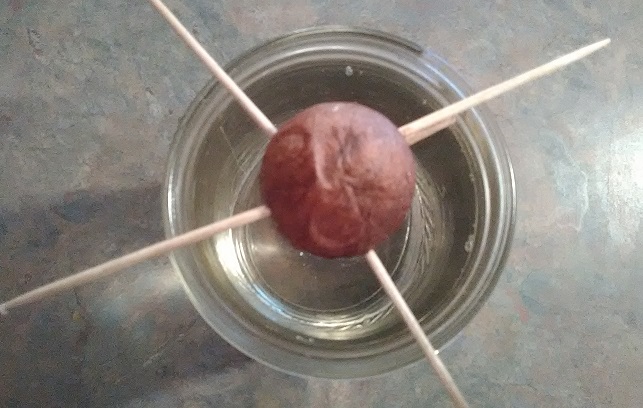
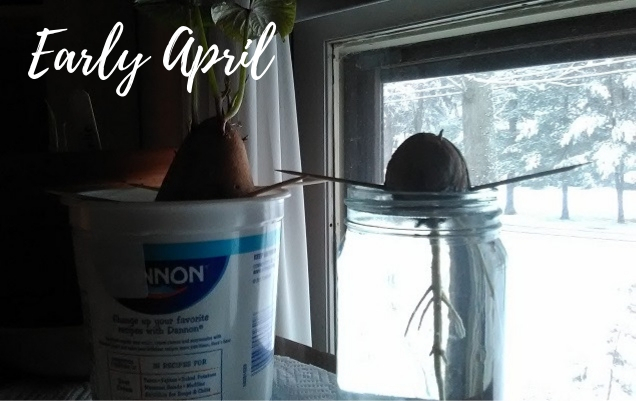
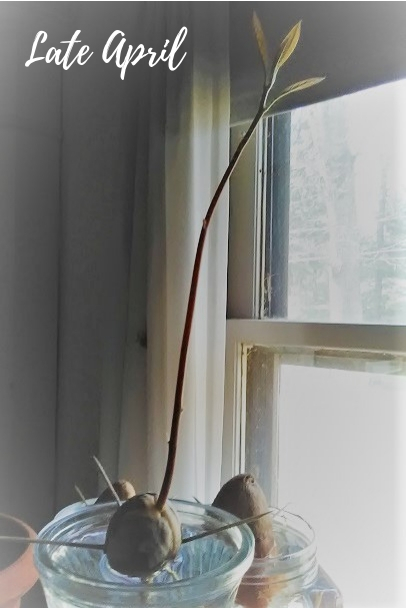

One mistake that I made was not to trim my plant back. I read the recommendation to do this after it was way over 6 inches tall, and I as afraid to do it at that point. This page has information on trimming your plant, which will encourage your tree to be bushy, rather than leggy, like mine. It also explains how to plant your tree outdoors if you live in a warm enough climate. We do not, so I am going to keep mine as a houseplant.

I keep mine in the front window of my house next to the front door and people are often curious about it, since you can clearly see the pit sitting above the soil at the base of the plant. I’ve read that if an avocado houseplant bears fruit, it will take about 20 years. My 22-year-old son joked that he is going to eat the first avocado that it produces, when he is 42!

So, the next time you slice open an avocado, consider growing your own avocado tree.
